Contents
1.1 Registering for Retiree Self-Service
1.3 Recovering a Lost User ID or Password
1.4 Changing a User ID or Password
4.1 Navigating to the Contact Information Screen
4.2 Changing Your Contact Information
4.3 Adding an Alternate Address
4.4 Changing Your Alternate Address
4.5 Changing Your Contact Information (Phone Number / Email Address)
4.6 Viewing Pending Address Changes
4.7 Viewing Address Change History
4.8 Viewing Previous Contact Information Changes
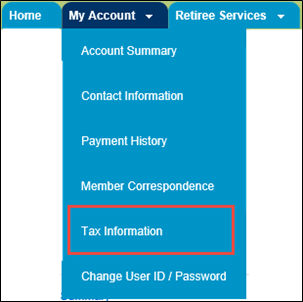
7.1 Navigating to the Tax Information Screen
7.2 Viewing the Tax Information Screen
7.3 Changing Your Tax Withholdings
7.4 Viewing Tax Withholding Changes
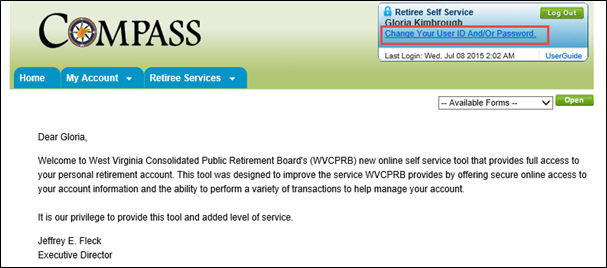
The West Virginia Consolidated Public Retirement Board (WVCPRB) created the Retiree Self-Service site to allow you convenient access 24 hours a day, 7 days a week to your retirement account information. It enables you to view your personal information, benefit payment history, account summary, and other relevant details specific to your account. In addition, you can update your address and contact information on record with our office, as well as change your tax withholding or direct deposit information. This state-of-the-art technology tool provides you with powerful access to your personal retirement account.
1.1 Registering for Retiree Self-Service
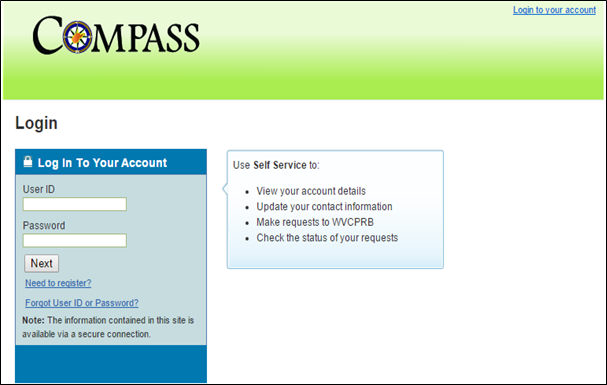
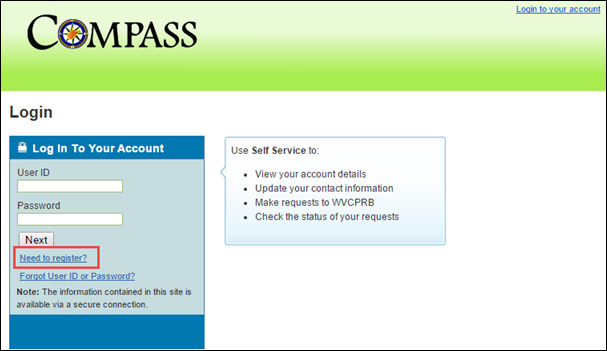
The Login screen is the starting point for you to access the Retiree Self-Service website, but before you login for the first time, you must register. To register for a Retiree Self-Service account, you will need to follow the steps outlined here and enter all required information on each screen. If you do not enter required information, you will not be able to successfully register on the Retiree Self-Service website. If you incorrectly enter information, such as your Social Security Number, birth date, or Net Pay, five consecutive times, the registration process will be locked. If your registration is locked, you will need to contact WVCPRB to unlock it.
Step 1 -- Start
by clicking  on the
Login screen.
on the
Login screen.
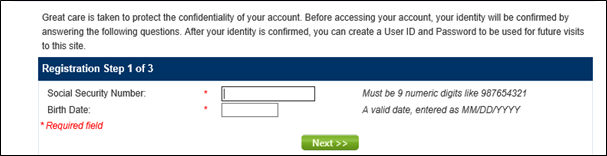
Step 2 -- Enter your Social
Security Number, Birth Date,
and then click  to continue.
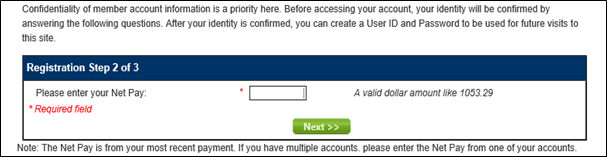
Step 3 -- Enter your net pay from your
most recent payment. This should be the amount deposited into your account
for your last benefit payment. Click  to continue.
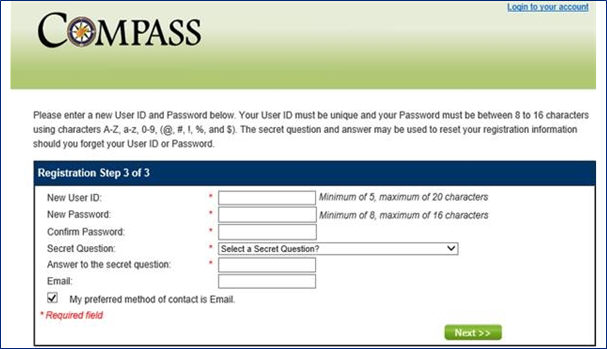
Step 4 -- Enter a New
User ID and New Password,
following the guidelines displayed on the screen. Your email address is
collected in order to send confirmation of your registration. Select a
secret question and answer which are used to verify your identity in the
event you forget your password. Click  to continue.
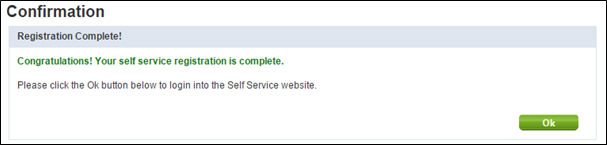
Step 5 -- The screen that appears confirms
your registration. Click  to go to the Retiree
Self-Service screen. If the retiree has an email address on record,
the Self-Service Registration email is sent to the retiree.
to go to the Retiree
Self-Service screen. If the retiree has an email address on record,
the Self-Service Registration email is sent to the retiree.
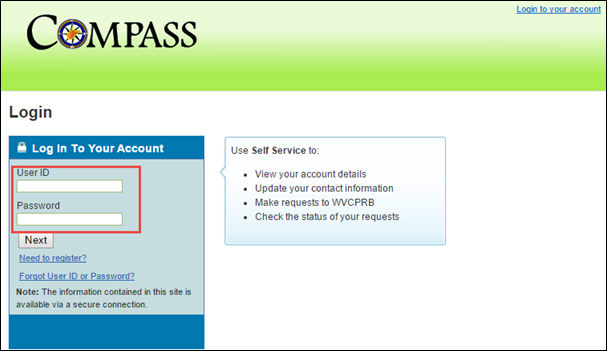
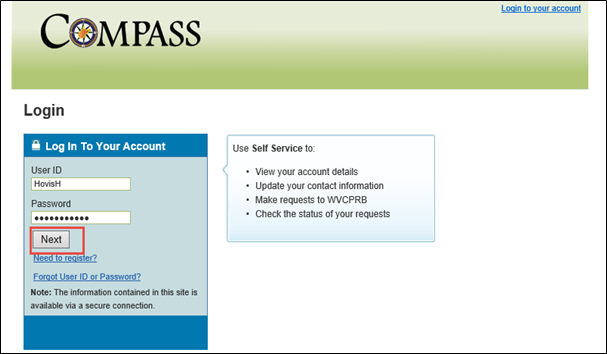
After you register for a Retiree Self-Service account, you can use your User ID and password to log in to the Retiree Self-Service website 24 hours a day, 7 days a week to access your account information. The following steps describe how to log into the Retiree Self-Service website.
Note: If you try to log in five consecutive times with the incorrect User ID, password, or secret question your account will be locked. If your account is locked, you will need to contact WVCPRB to unlock it.
Step 1 -- From the Retiree Self-Service Login screen, enter your User ID and Password into the fields.
Step
2 -- Click  .
.
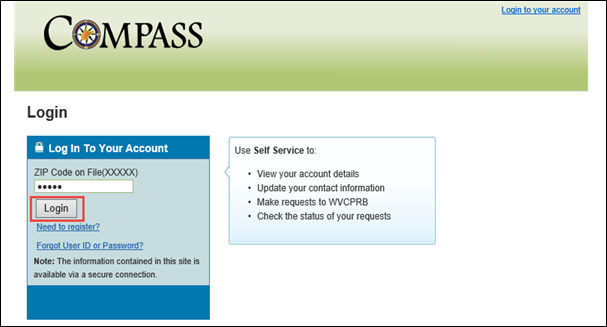
Step 3 -- Answer the security question. The security questions display randomly and can be one of the following:
· Last four digits of your SSN
· Date of Birth (MMDD)
· Year of Birth (YYYY)
· ZIP Code on File (XXXXX)
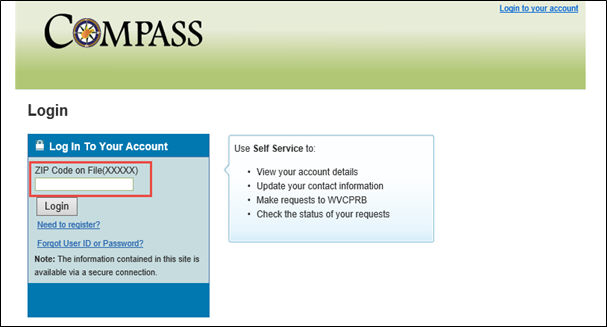
Step
4 -- Click  .
.
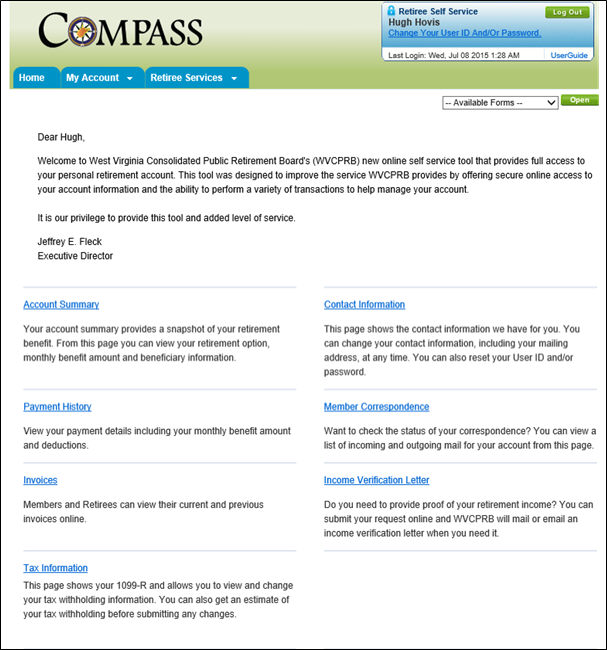
Step 5 -- The Retiree Self-Service home page is displayed.
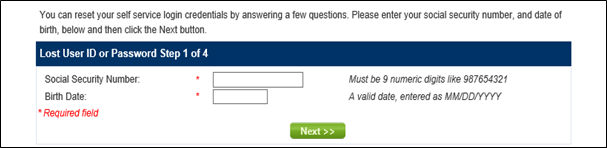
1.3 Recovering a Lost User ID or Password
If you forget your User ID or password, you are able to obtain a new one by clicking on the Forgot Password / User ID link on the Login screen and following these steps. You must enter all required information on each screen. If you do not enter required information, you will not be able to successfully recover your lost User ID or password.
Step
1 -- Click  .
.

Step
2 -- Enter
your Social Security Number,
Birth Date, and then click  .
.
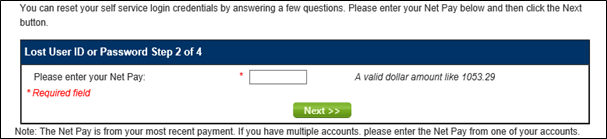
Step
3 -- Enter
the net pay of your most recent payment, then click
 .
.
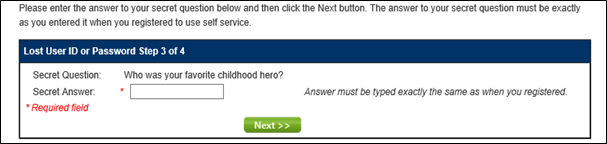
Step
4 -- Answer
the secret question, then click
 .
.
Step 5 -- Your User ID is displayed. Create a New Password.
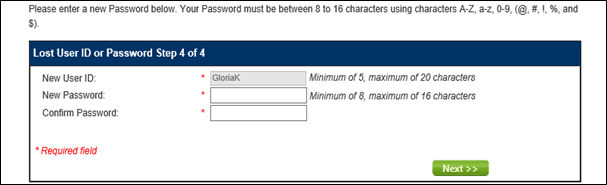
Step
6 -- The
screen that appears confirms the update to your registration. If you have
an email on record with WVCPRB, the User ID / Password Change email is
also sent to you. Click
 .
.
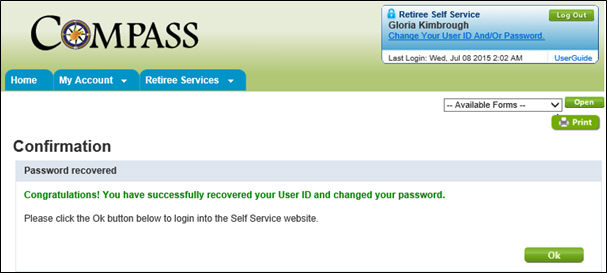
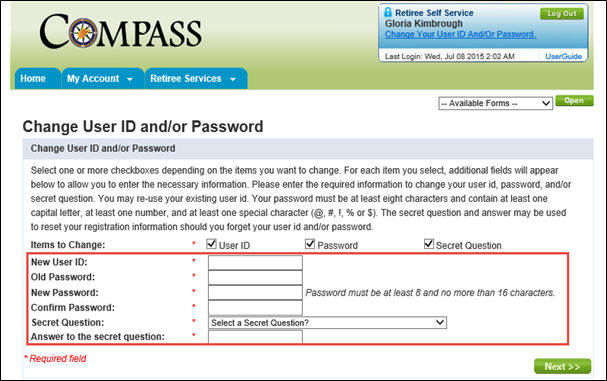
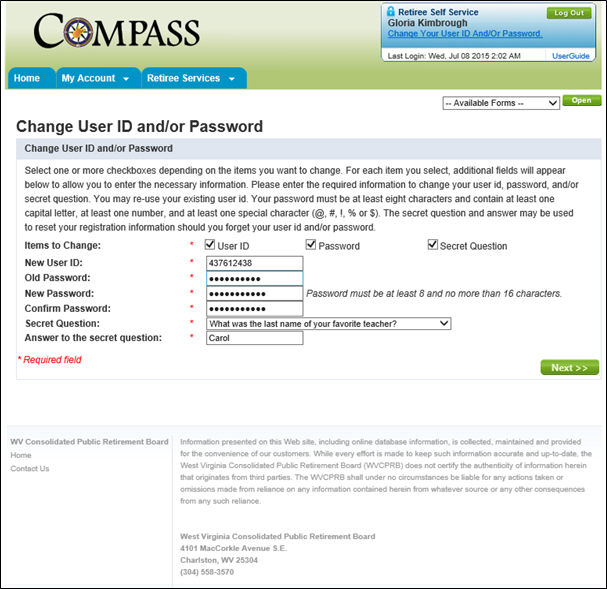
1.4 Changing a User ID or Password
If you want to change your User ID or password, you can do so from the Retiree Self-Service home page. You must enter all required information on each screen. If you do not enter required information, you will not be able to successfully change your lost User ID or password.
Step 1 -- After logging in to the Retiree Self-Service website (see Section 1.2), click the Change Your User ID And / Or Password link.
Step 2 -- Select the check box for the items you want to change. You can select multiple check boxes to change more than one item.
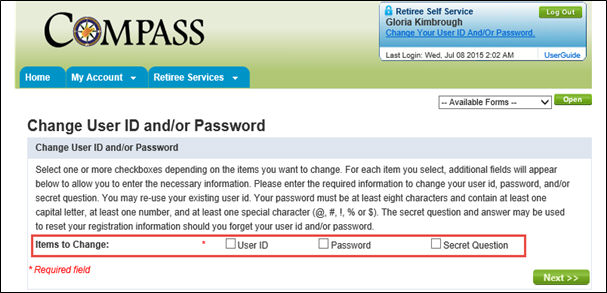
Step 3 -- Enter the required information. The required information changes based on the selection made in Step 2.
If you select the User ID check box, enter a new User ID
If you select the Password check box, enter the old password, new password, and confirm the new password
If you select Secret Question check box, select a question from the drop down menu and enter an answer to the secret question
Step
4 -- Click  .
.
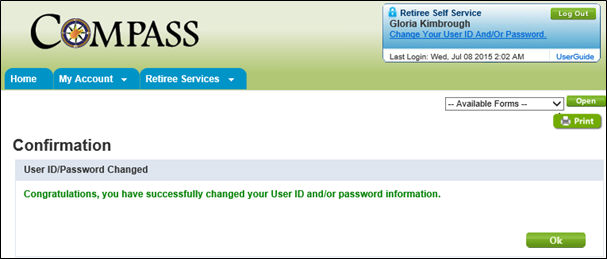
Step
5 -- The
screen that appears confirms your changes.
Click  to return to
the Home screen.
to return to
the Home screen.
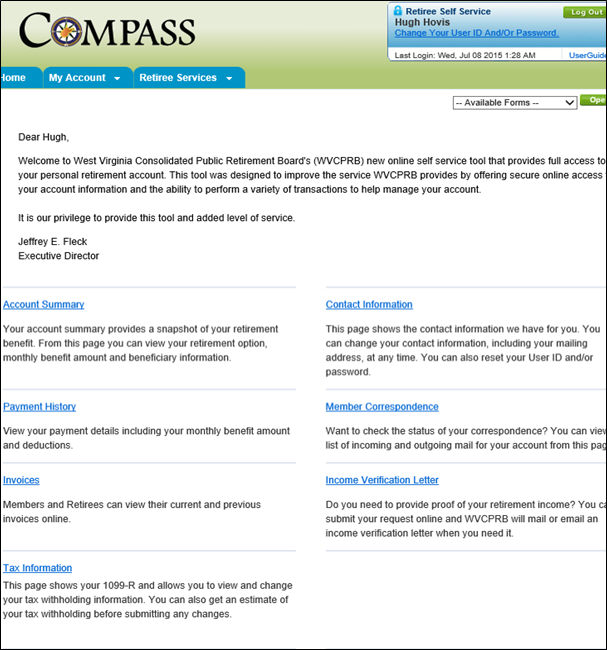
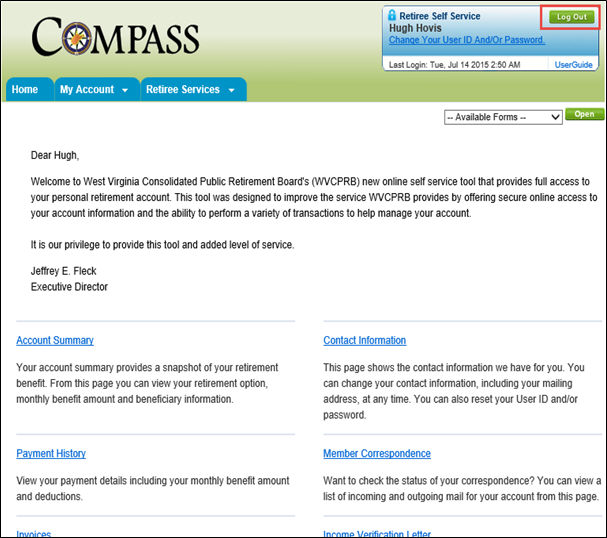
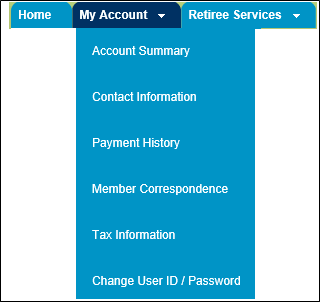
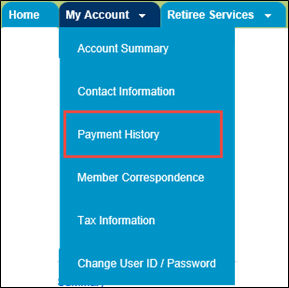
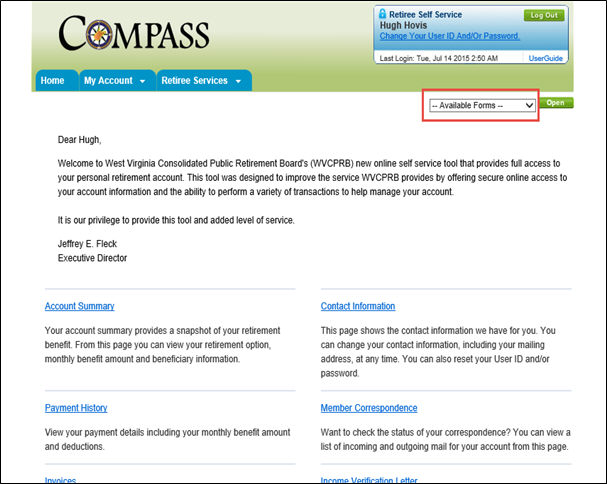
From the Home screen, you can navigate to different sections of the website by clicking on the links in the bottom half of the screen.
You are also able to access these screens from the drop down menus at the top of the Home screen. These menus are available on every screen within the Retiree Self-Service website.
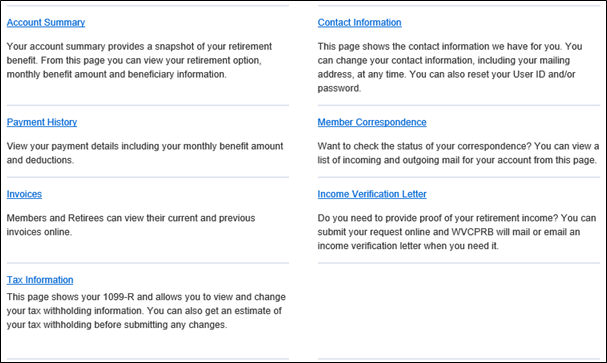
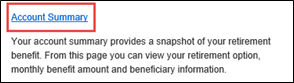
The Account Summary screen shows information regarding the benefits you are receiving. From this screen, you can view your direct deposit information, current federal tax withholdings, and any other deductions.
The following steps describe how to navigate to the Account Summary screen. You must be logged into the Retiree Self-Service website to follow the steps in this section.
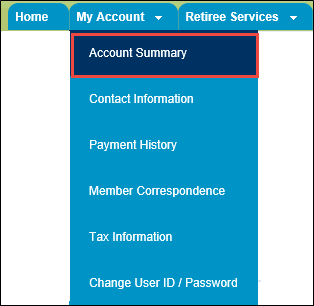
Step 1 -- On the Home screen, either select Account Summary from the My Account drop down menu or click the Account Summary link.
Step 2 -- The Account Summary screen is displayed. You are able to view specific information regarding benefits that you are receiving. You are also able to change and update your tax withholdings and direct deposit information.
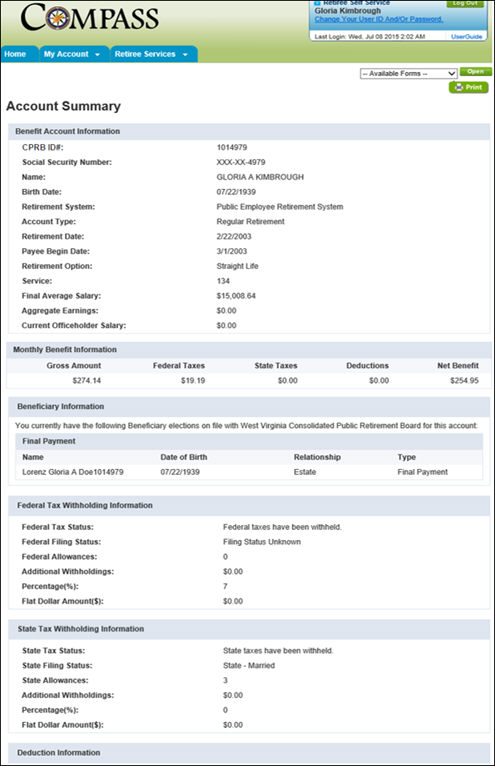
The Benefit Account Information section shows basic information regarding the benefit being received, including your CPRB ID, the retirement system from which the benefit is paid, the type of account, the account effective date, your retirement option and total years of service.
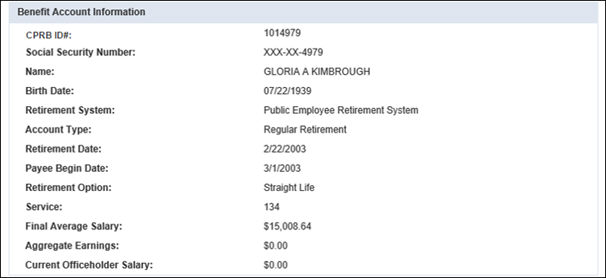
The Monthly Benefit Information section shows the gross and net amount of the benefit, along with the amounts that are being deducted. If any changes are made to the tax information, the net amount of the benefit received would change as well.

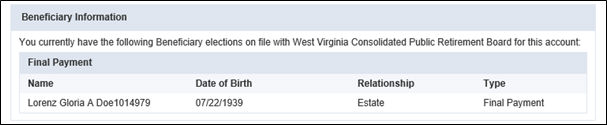
The Beneficiary Information section displays all your current beneficiary designations.
The Tax Withholding Information section shows the Federal/State tax information for the benefit. You will be able to change your tax elections by clicking on the Change your tax information click here link.


If there are any other deductions being withheld from the benefit, they display in the Deduction Information section.

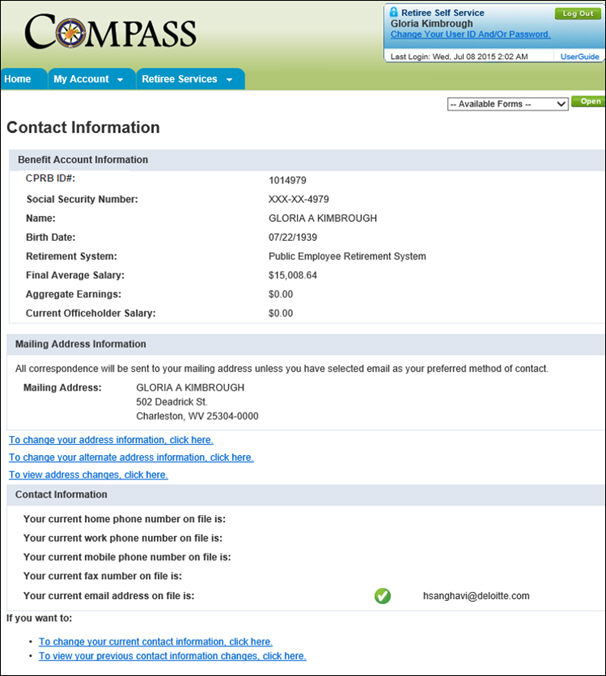
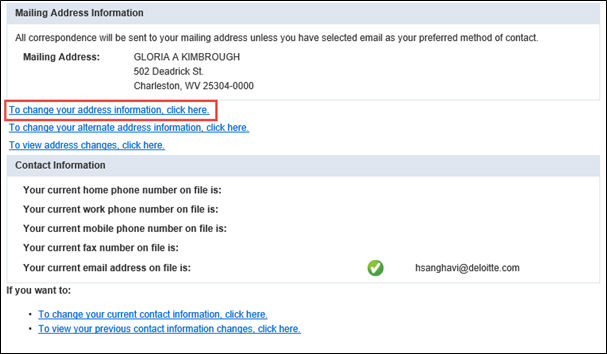
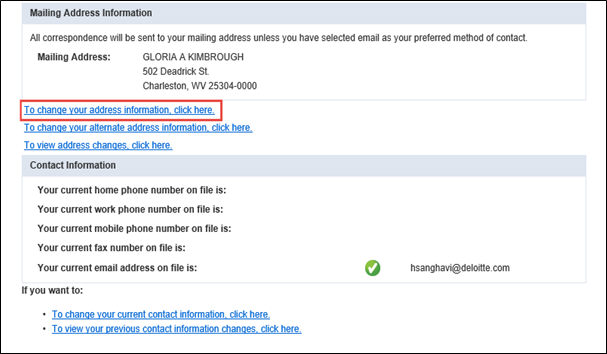
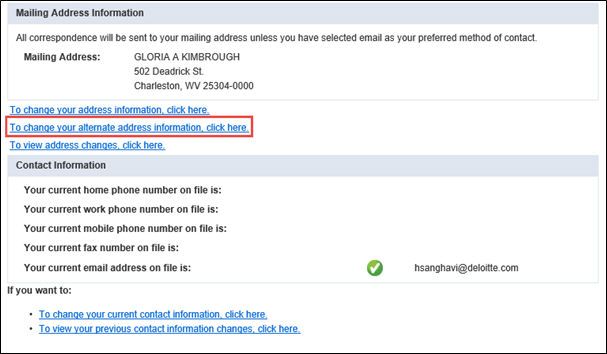
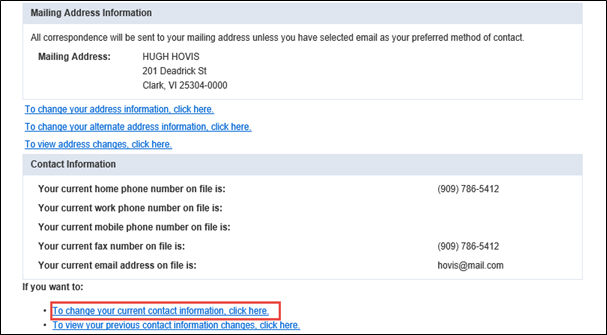
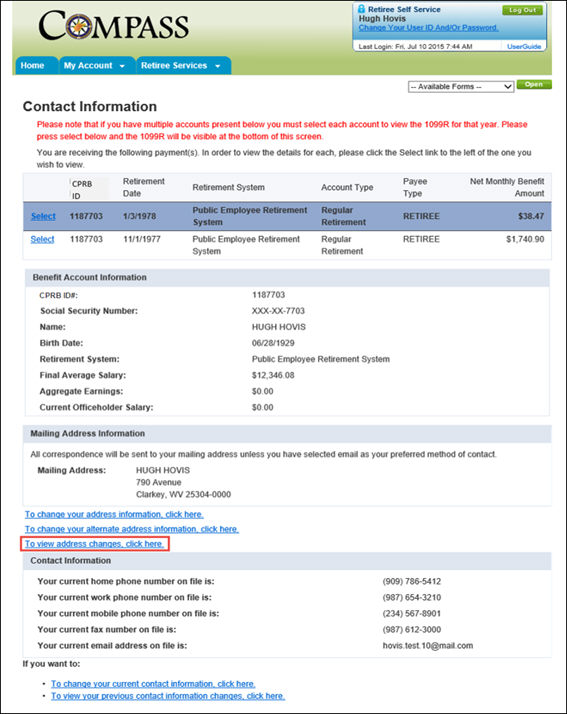
The Contact Information screen displays the contact information, such as address, phone number, or email address that is on record with WVCPRB.
4.1 Navigating to the Contact Information Screen
The following steps describe how to navigate to the Contact Information screen. You must be logged into the Retiree Self-Service website to follow the steps in the sections that follow.
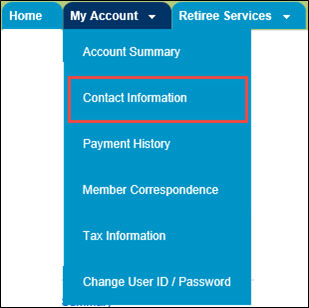
Step 1 -- On the Home screen, either select Contact Information from the My Account drop down menu or click the Contact Information link.

Step 2 -- The Contact Information screen is displayed.
4.2 Changing Your Contact Information
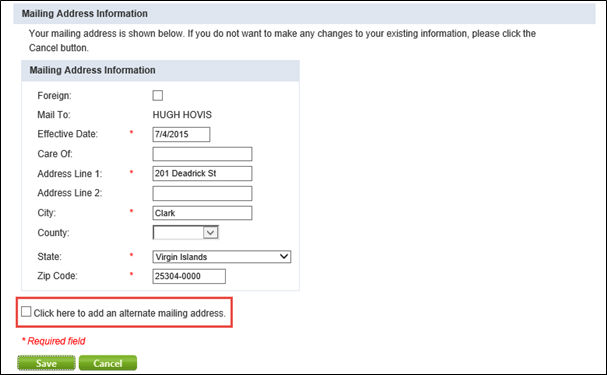
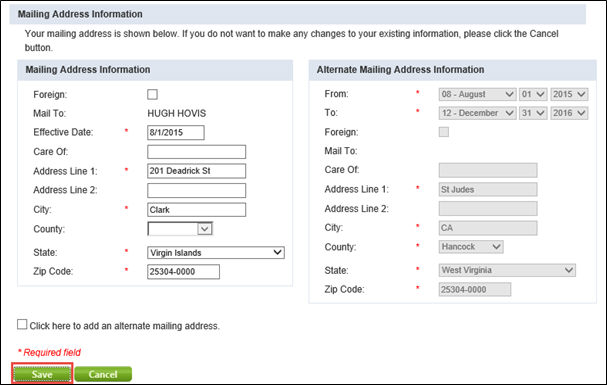
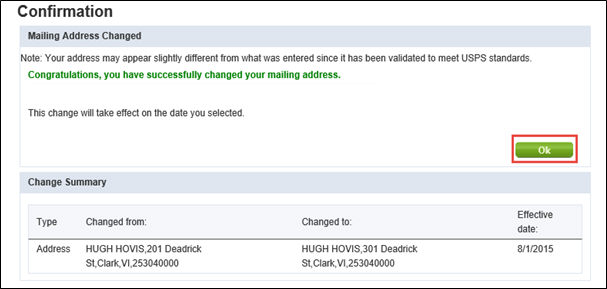
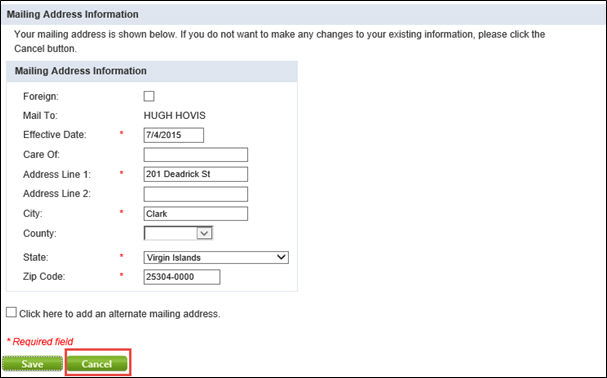
Follow the directions in Section 4.1, Navigating to the Contact Information Screen, and then follow the steps below to change your contact information. You must enter all required information on each screen. If you do not enter required information, you will not be able to successfully change your contact information.
Step 1 -- Click the To change your address information, click here link.
Step 2 -- Enter your new address.
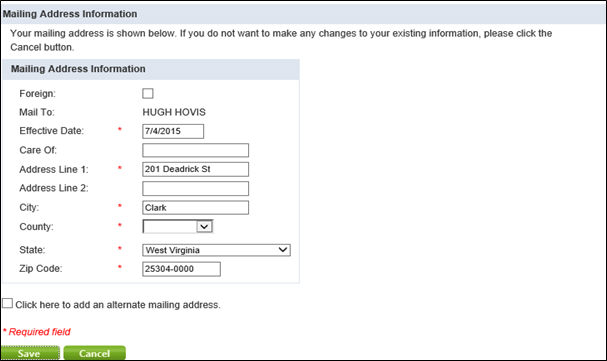
Step
3 -- Click
 .
.
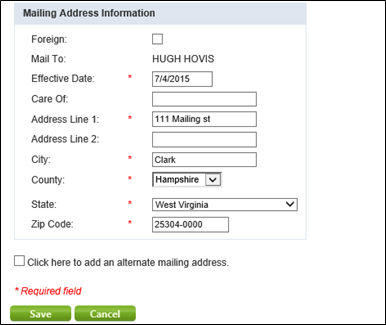
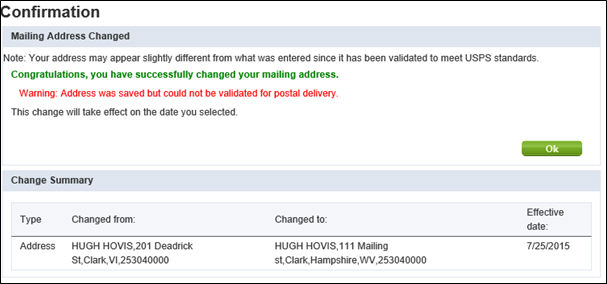
Step
4 -- The
Confirmation screen is displayed,
and it confirms the change in mailing address. Click  to view your pending address changes.
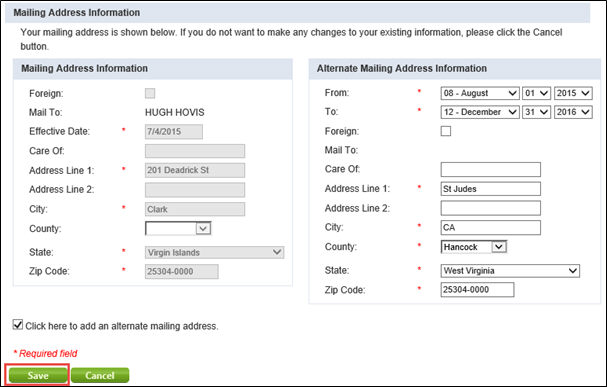
4.3 Adding an Alternate Address
An alternate address is a secondary mailing address that can be used temporarily or for recurring periods of time. For example, if you often live at a different residence for several months per year, an alternate address should be on record with WVCPRB. Follow the directions in Section 4.1, Navigating to the Contact Information Screen, and then follow the steps below to add an alternate address. You must enter all required information on each screen. If you do not enter required information, you will not be able to successfully add an alternate address.
Step 1 -- Click the To Change your current address information, click here link.
Step 2 -- Select the Click here to add an alternate address check box.
Step 3 -- Enter required information in the Alternate Mailing Address Information section.
S
Step 4 -- Click
 .
.
Step
5 -- The
Confirmation screen is displayed,
and it confirms the addition of your alternate mailing address. Click
 to
view your pending address changes.
to
view your pending address changes.
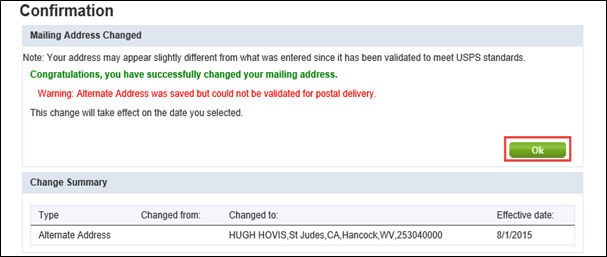
4.4 Changing Your Alternate Address
Follow the directions in Section 4.1, Navigating to the Contact Information Screen, and then follow the steps below to change an existing alternate address. You must enter all required information on each screen. If you do not enter required information, you will not be able to successfully change your alternate address.
Step 1 -- Click the To Change your alternate address information, click here link.
Step 2 -- To
change your alternate mailing address, specify the date range for when
it is effective and click  .
.
Step 3 -- The
Confirmation screen is displayed,
and it confirms the changes to your alternate address. Click  to
view your pending address changes.
to
view your pending address changes.
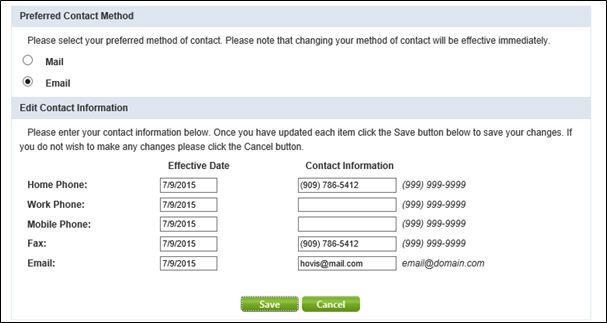
4.5 Changing Your Contact Information (Phone Number / Email Address)
Follow the directions in Section 4.1, Navigating to the Contact Information Screen, and then follow the steps below to change your contact information. You must enter all required information on each screen. If you do not enter required information, you will not be able to successfully change your contact information.
Note: WVCPRB will contact you by phone only if other contact methods have been unsuccessful.
Step 1 -- Click the To Change your current contact information, click here link.
Step 2 -- Update your phone number and email information. Enter an effective date. The effective date of the change will automatically default to the current date. If you choose Email for your preferred method of contact, you will receive all correspondence via email, except your 1099R, which is required by federal law to be mailed to your home address.
Step 3 -- Click  .
.
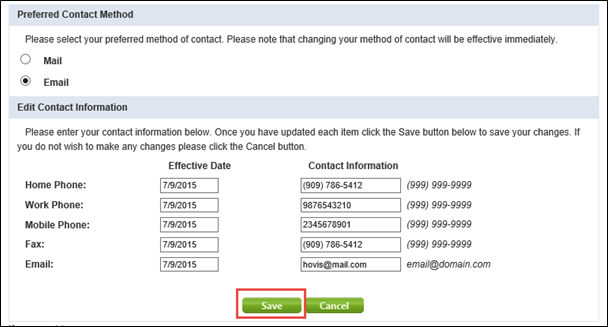
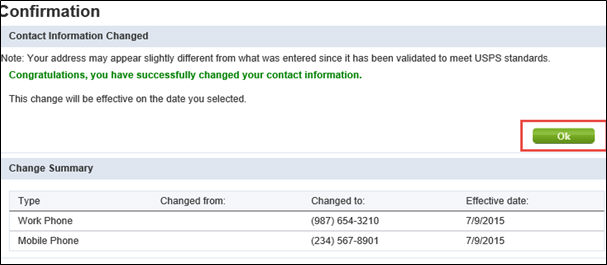
Step
4 -- The Confirmation screen is displayed, and it confirms the
change to your contact information. Click  to
return to the View Phone/Email
Changes screen.
to
return to the View Phone/Email
Changes screen.
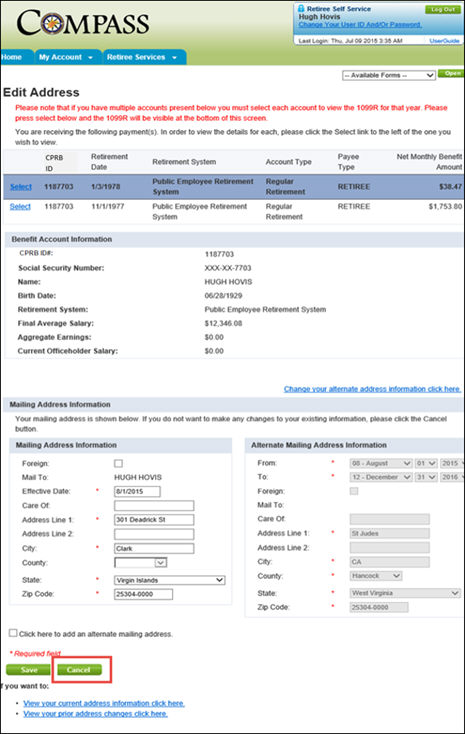
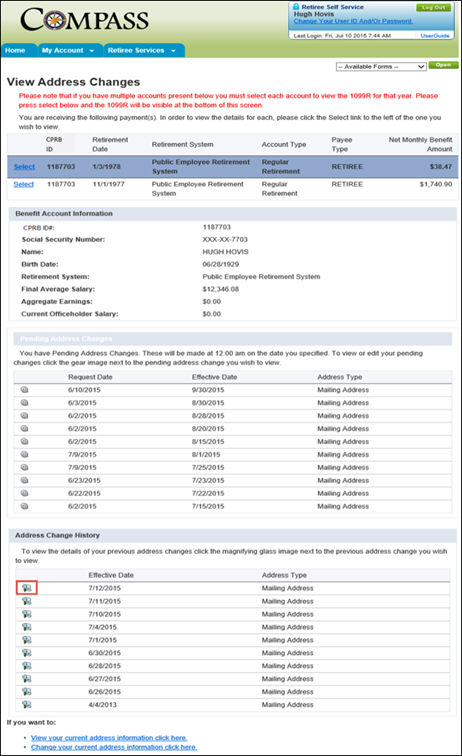
4.6 Viewing Pending Address Changes
You can view and edit your pending address changes using the Contact Information screen. Follow the directions in Section 4.1, Navigating to the Contact Information Screen, and then follow the steps below to view pending address changes.
Step 1 -- Click the To view address changes, click here link.
Step
2 -- Your
benefit account information, pending address changes, and address change
history are displayed. Click the  edit icon to view/edit the details of a pending
address change.
edit icon to view/edit the details of a pending
address change.
Step
3 -- The
Edit Address screen is displayed
with the changes made for that pending address change. You can make changes,
then click  or
or  , which returns you
to the Contact Information
screen.
, which returns you
to the Contact Information
screen.
4.7 Viewing Address Change History
You can view the history of the changes made to your mailing address using the Contact Information screen. Follow the directions in Section 4.1, Navigating to the Contact Information Screen, and then follow the steps below to view your address change history.
Step 1 -- Click the To view address changes, click here link.

Step
2 -- Your benefit account information, pending
address changes, and address change history are displayed. Click the  view icon to view the details
of an address change.
view icon to view the details
of an address change.
Step
3 -- The Edit
Address screen is displayed with the changes made for that address
change. You can make changes, then click  or
or  , which returns you
to the Contact Information
screen.
, which returns you
to the Contact Information
screen.
4.8 Viewing Previous Contact Information Changes
You can view previous contact information changes you entered using the Contact Information screen. Follow the directions in Section 4.1, Navigating to the Contact Information Screen, and then follow the steps below to view your previous contact information changes.
Step 1 -- Click the To view your previous contact information changes, click here link.
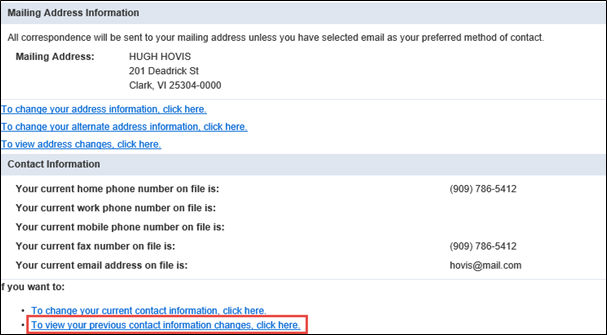
Step 2 -- A history of contact information changes displays. Click the To view your current contact information, click here link to return to the Contact Information screen.

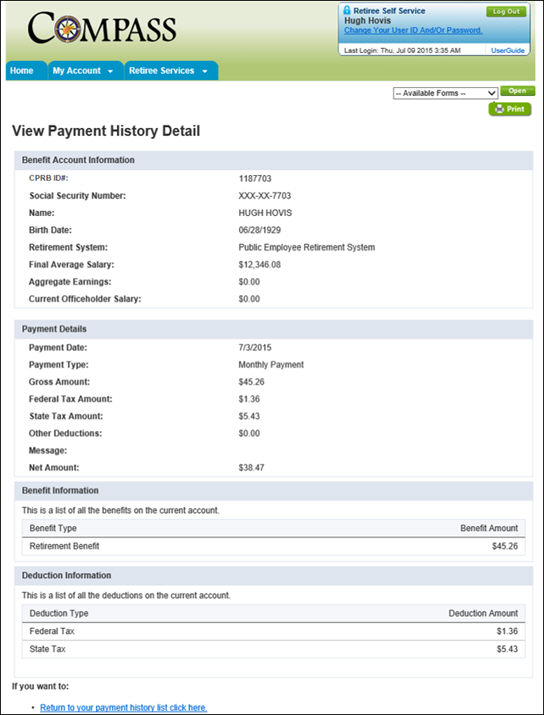
The Payment History screen shows information regarding the benefit that you are receiving. From this screen, you can view information regarding individual payments that you have received in the past, along with the amount of deductions and taxes that were withheld from the benefit.
Note: You can only view your payment history back to a certain date. If you need payment history prior to that date, WVCPRB can provide this for you.
The following steps describe how to navigate to the Payment History screen. You must be logged into the Retiree Self-Service website to follow the steps in the sections that follow.
Step 1 -- On the Home screen, select either Payment History from the My Account drop down menu or click the Payment History link.
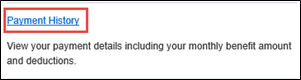
Step 2 -- The Payment History screen is displayed.
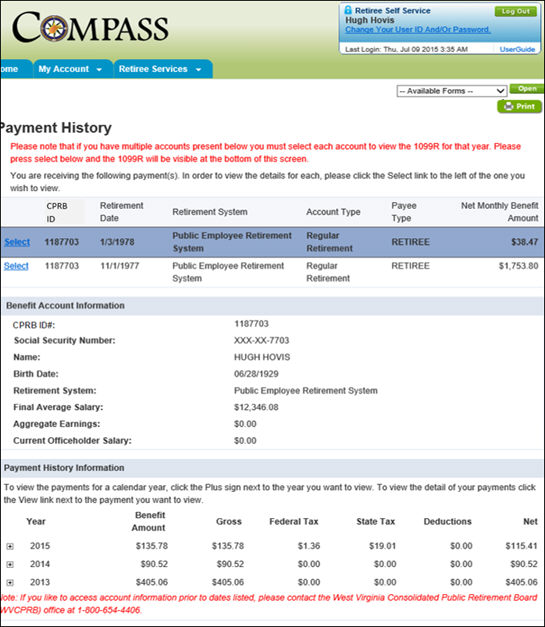
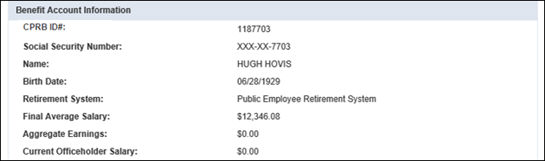
The Benefit Account Information section shows basic information about the benefit being received. Here you see your CPRB ID, Partial Social Security Number, Name, Birth Date and the Retirement System from which the benefit is paid.
The Payment History Information section of this screen shows a summary of the benefits that you have received, broken down by year.
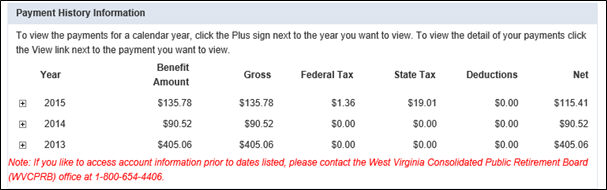
To view
individual payments received, click the  expand icon next
to the year you would like to view. This expands the year section to show
all benefits that were received during that year.
expand icon next
to the year you would like to view. This expands the year section to show
all benefits that were received during that year.
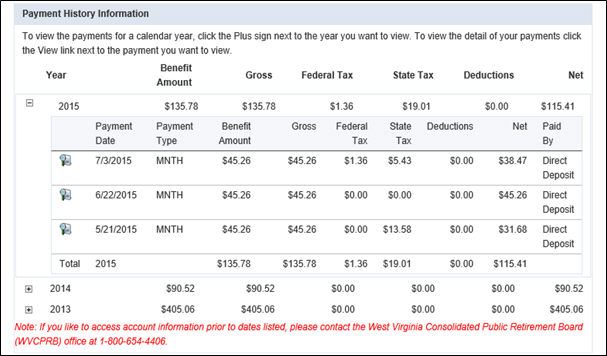
To view more specific information
on an individual payment that has been received, click the  view icon next to the payment
that you would like to view. This displays another screen that shows you
more detailed information about that benefit payment.
view icon next to the payment
that you would like to view. This displays another screen that shows you
more detailed information about that benefit payment.
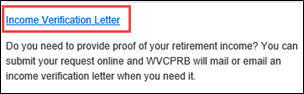
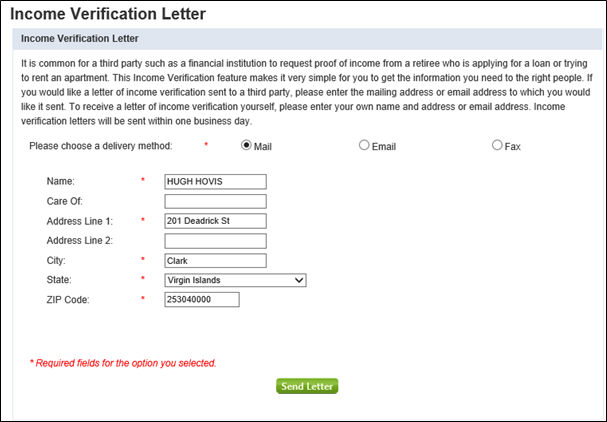
The Income Verification Letter screen makes it simple for you to provide proof of income to third parties. You must enter all required information on each screen. If you do not enter required information, you will not be able to successfully request an Income Verification Letter.
You must be logged into the Retiree Self-Service website to follow the steps below.
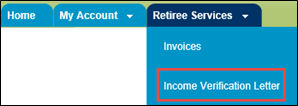
Step 1 -- On the Home screen, select either Income Verification Letter from the Retiree Services drop down menu or click the Income Verification Letter link.
Step 2 -- Select the delivery method (Mail or Email or Fax) by which your letter should be sent.
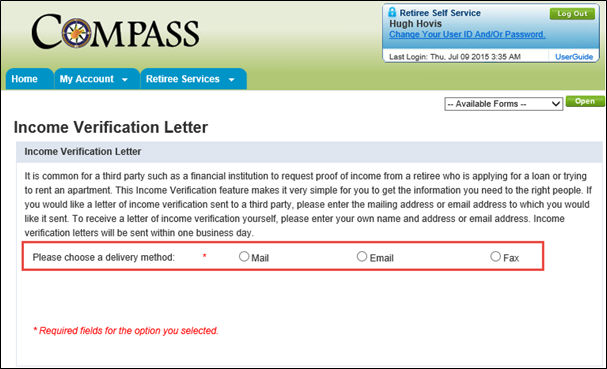
Step 3 -- If you selected Mail in the last step, enter the mailing address or select the check box to use the effective mailing address on record with WVCPRB. If you selected Email in the last step, enter your email address or select the check box to use the email address that is on record with WVCPRB.
Step
4 -- Click
 .
.
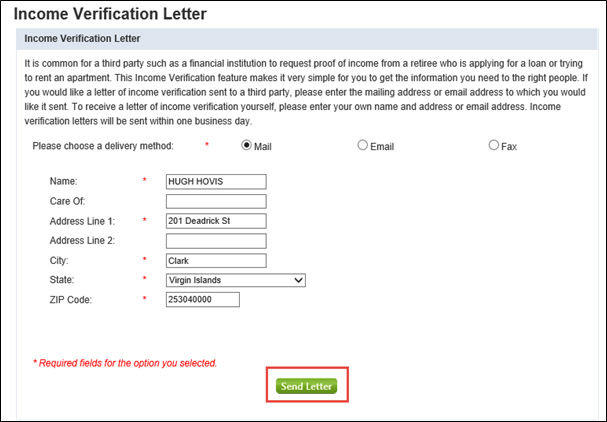
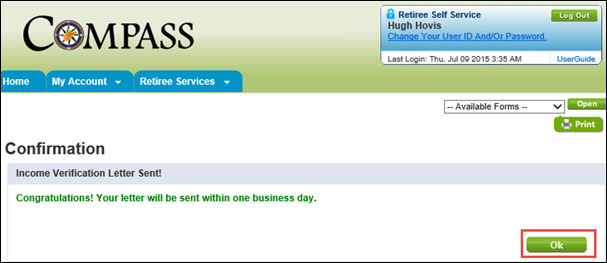
Step
5 -- The
Confirmation screen is displayed,
and it confirms that the letter has been sent. Click  to
return to the Income Verification
Letter screen.
to
return to the Income Verification
Letter screen.
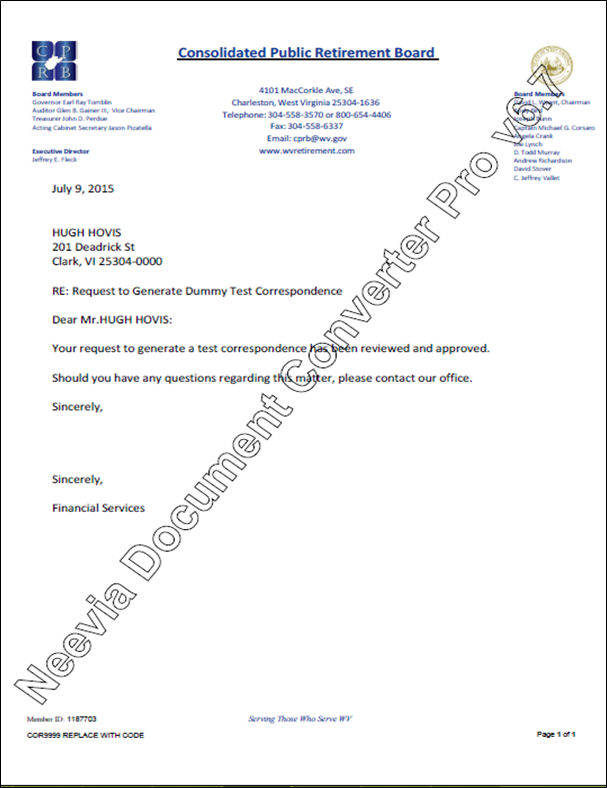
Note: The screen below shows an example of the Income Verification Letter (this is a "dummy" letter).
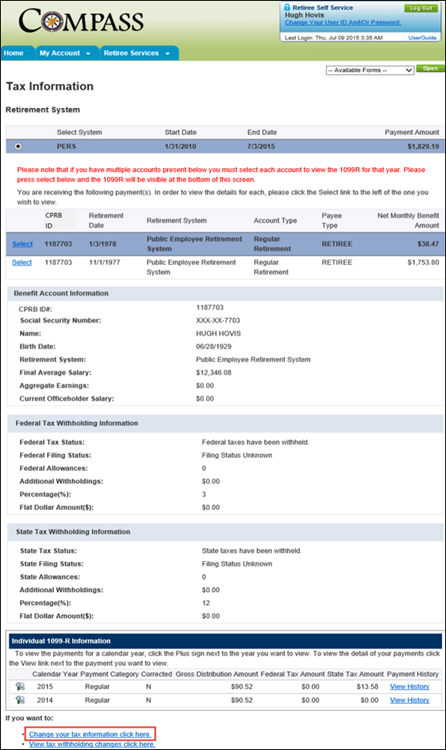
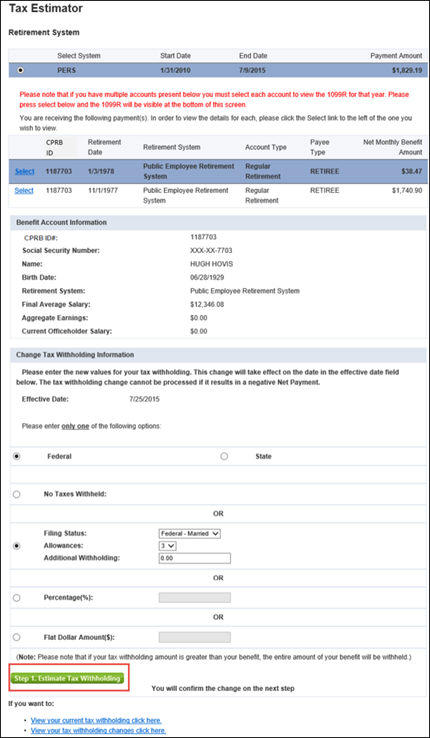
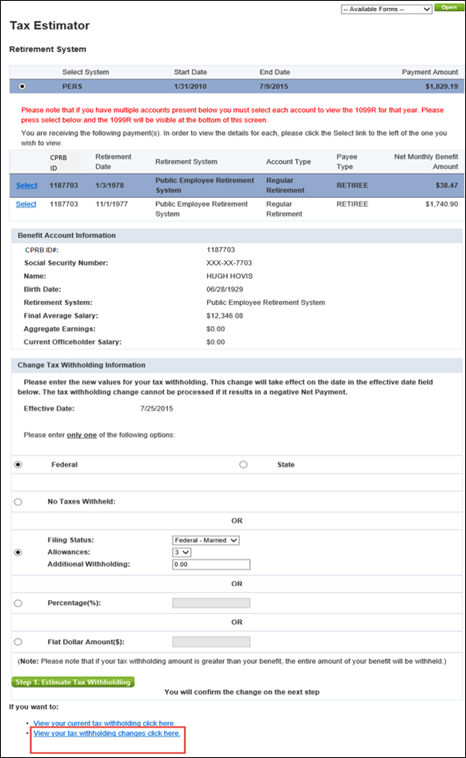
The Tax Information screen summarizes the federal taxes currently withheld from your benefit. On this screen, you can estimate how different withholdings change your net benefit amount. You can view and change your tax withholding from this screen.
7.1 Navigating to the Tax Information Screen
The following steps describe how to navigate to the Tax Information screen. You must be logged into the Retiree Self-Service website to follow the steps in the sections that follow.
Step 1 -- On the Home screen, select either Tax Information from the My Account drop down menu or click the Tax Information link.
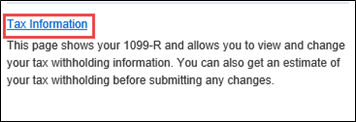
Step 2 -- The Tax Information screen is displayed.
7.2 Viewing the Tax Information Screen
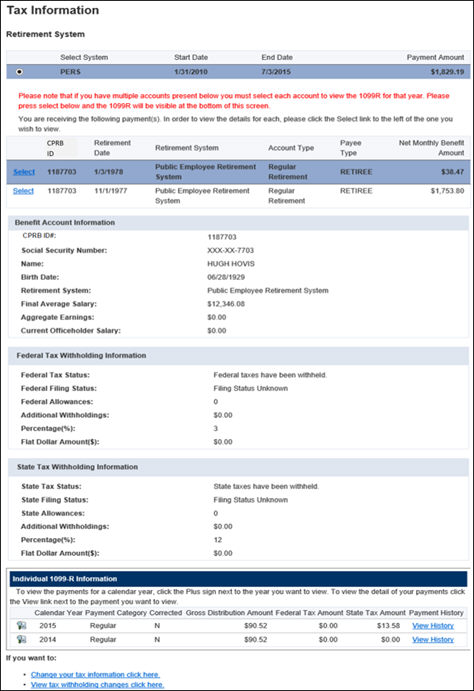
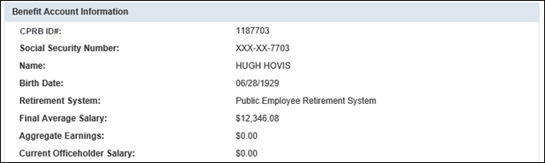
The Benefit Account Information section shows basic information regarding your benefit, including your CPRB ID, partial Social Security Number, name, birth date and the retirement system from which the benefit is paid.
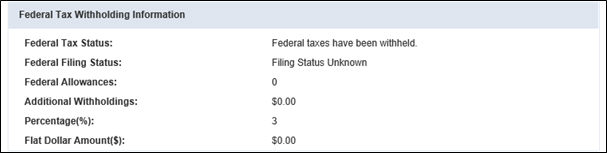
The Federal Tax Withholding Information section shows your current Federal tax details.
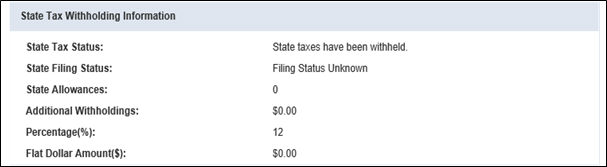
The State Tax Withholding Information section shows your current State tax details.
The Individual
1099-R Information section allows you to view your tax documents for
any individual year. To view a 1099-R, click the  view icon next to the year.

7.3 Changing Your Tax Withholdings
Using the Tax Information screen, you can change your tax withholding. If you receive payments from multiple benefit accounts and wish to change the withholdings in each of them, you must do so individually.
Follow the directions in Section 9.1, Navigating to the Tax Information Screen, and then follow the steps below to change your tax withholdings. You must enter all required information on each screen. If you do not enter required information, you will not be able to successfully change your tax withholdings.
Step 1 -- Click the Change your tax information, click here link.
Step 2 -- Enter your new tax details, such as no taxes withheld, filing status (i.e., Federal – Married, Federal – Single, Married, but withhold at higher single rate), allowances, additional withholding, percentage, or flat dollar amount.
Note: You must select the radio button before entering information.
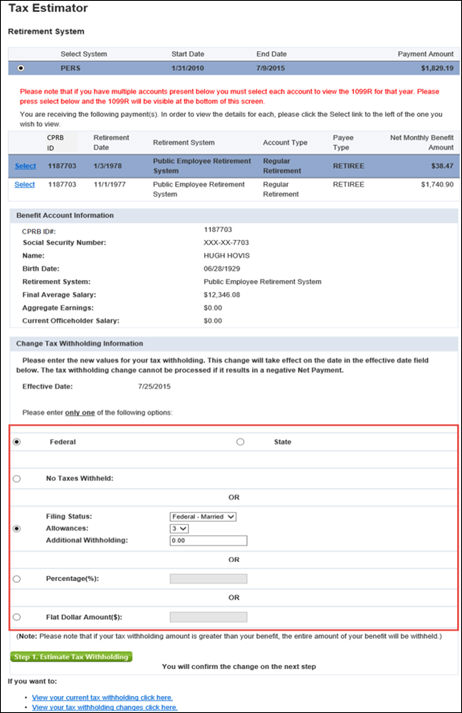
Step
3 -- Click  to see how your benefit payment will change
based on your selection.
to see how your benefit payment will change
based on your selection.
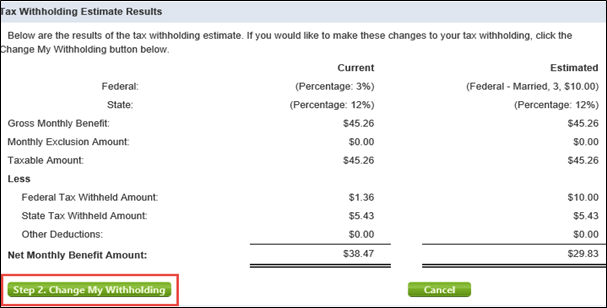
Note: Your tax withholding information will not change when you click this button. You will confirm the change on the next screen.
Step 4 -- Your Tax Withholding Estimate Results display. Compare the current and estimated withholdings and the effect the new withholdings have on your monthly benefit amount.
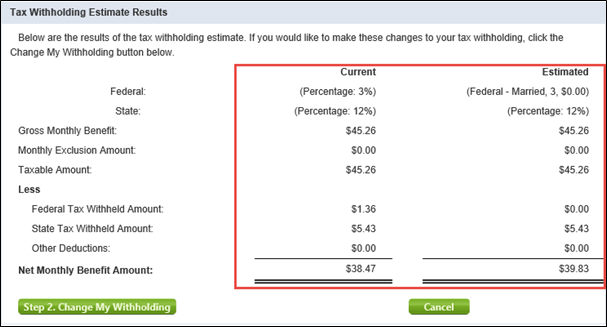
Step
5 -- To accept
the change to your tax withholdings based on the estimate, click
 .
If you do not want to change the tax withholding as shown, click
.
If you do not want to change the tax withholding as shown, click
 .
.
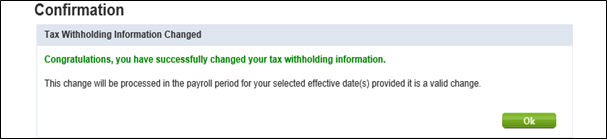
Step
6 -- The Confirmation screen is displayed, and it confirms the
changes to your tax withholding. Click  to
view your tax withholding changes.
to
view your tax withholding changes.
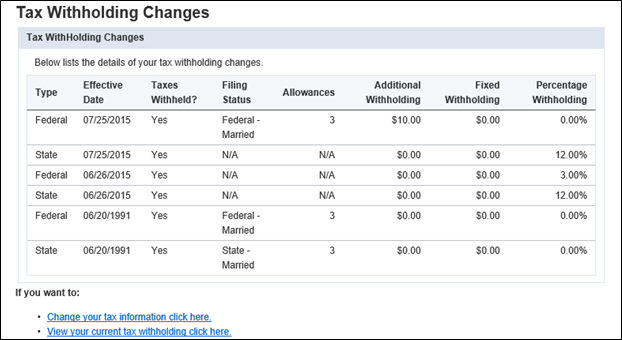
7.4 Viewing Tax Withholding Changes
Follow the directions in Section 9.1, Navigating to the Tax Information Screen, and then follow the steps below to view your tax withholding changes.
Step 1 -- Click the View tax withholding changes, click here link.
Step 2 -- The Tax Withholding Changes screen displays current withholding information.
Using the Retiree Self-Service website, you can view and print electronic versions of the following forms:
· Personal Information Change
· State Tax Withholding Certificate
After printing and entering information into the form, you must mail the form to WVCPRB for staff to process it.
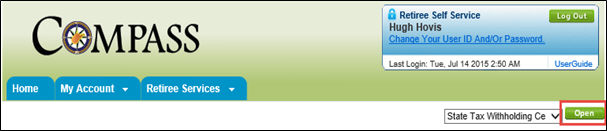
Step 1 -- The Available Forms drop down menu is available on the right side of the Home screen.
Step 2 -- Select the form you want to view from the Available Forms drop down menu.
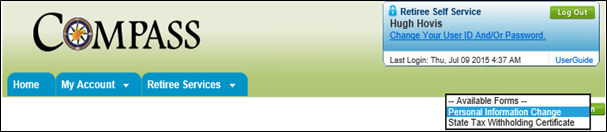
Step
3 -- Click
 .
.

Step 4 -- An electronic version of the selected form displays and is pre-populated with your information and a barcode that will allow WVCPRB to process it in a more efficient manner. This form must be printed and mailed to WVCPRB at the following address: 4101 MacCorkle Avenue SE, Charleston, WV 25304.
· Personal Information Change
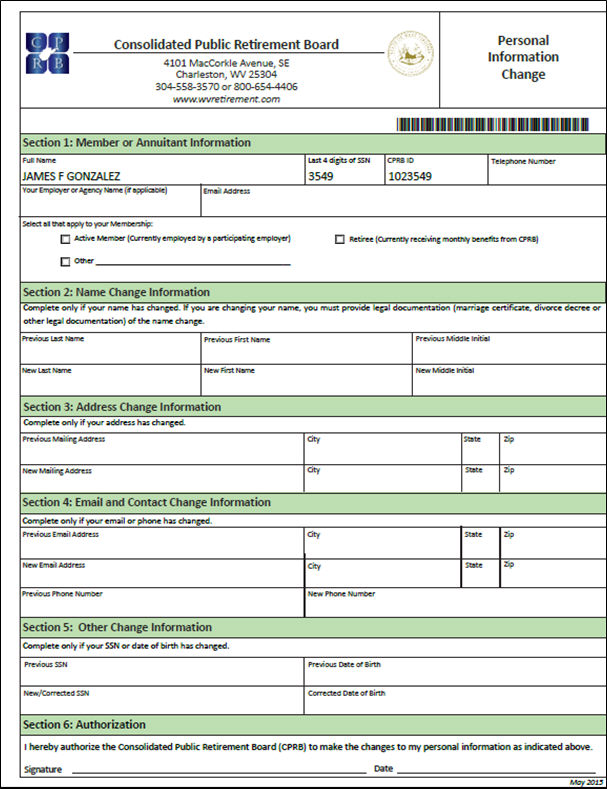
· State Tax Withholding Certificate

As a measure of security, the Retiree Self-Service website contains a timeout feature. If there is no activity (i.e., no actions such as saving, canceling, or confirming information) performed on the website for 15 minutes or if you close your browser window, you will automatically be logged out of the website and returned to the Login screen. In order to log back into the Retiree Self-Service website, re-enter your User ID and password and answer one of the security questions.
The Log Out feature allows you to leave the Retiree Self-Service website securely. When you are logged out, you cannot access any of the screens within the Retiree Self-Service website. The Log Out button appears in the top-right hand corner of every screen in the Retiree Self-Service website.
Step
1 -- Click  .
.